Generalities 1.1
The regional body in Africa for Cameroon particularly is OHADA meaning “Organisation pour L’Harmonisation en Afrique Les Droits Des Affairs”; in English Organisation for the Harmonisation of Business laws in Africa. Created by a treaty signed in Port Louis on the 17th October 1993, it is charged with enacting business and accounting related laws for its member states which include mostly French African speaking countries. Article 53 of the OHADA treaty says that it opens its doors to any member states of the African Union (AU) and non-African Union sates who are united to join by mutual agreement by any member states.
Target Audience: 1.2
The target audience for Solafide OHADA Accounting includes small and medium-sized enterprises (SMEs), accounting professionals, independent consultants, and individuals who require a reliable and user-friendly accounting solution that can be used offline.
Target Audience:
Features and Capabilities: 1.3
General ledger management:
Solafide OHADA Accounting allows users to record and manage their financial transactions, including accounts receivable, accounts payable, and general journal entries.
Financial statement generation:
Users can generate accurate financial statements, such as balance sheets, income statements, and cash flow statements.
Tax compliance:
Solafide OHADA Accounting incorporates tax regulations specific to OHADA member countries which also enable customization according to your own country, helping users stay compliant with local tax requirements.
Inventory management:
Users can track and manage their inventory, including stock levels, purchases, and sales.
Multi-currency support: still coming
The software supports multiple currencies, enabling businesses with international operations to manage their finances effectively.
Reporting and analysis:
Solafide OHADA Accounting offers various reporting and analysis tools, providing insights into financial performance and aiding decision-making processes.
Features and Capabilities:
Use Cases: 1.4
Small and medium-sized businesses can use Solafide OHADA Accounting to maintain accurate financial records, generate financial statements, and ensure compliance with OHADA regulations.
Accounting professionals can utilize the software to efficiently manage client accounts, prepare financial reports, and provide advisory services.
Independent consultants can benefit from Solafide OHADA Accounting's offline capabilities, allowing them to work remotely and serve their clients without relying on an internet connection.
Use Cases:
Benefits: 1.5
Simplified accounting processes: Solafide OHADA Accounting automates various accounting tasks, reducing manual effort and minimizing errors.
Offline functionality: The software's ability to run offline ensures uninterrupted access to accounting data, even in areas with limited or unreliable internet connectivity.
OHADA compliance: Solafide OHADA Accounting is specifically tailored to meet the accounting and tax requirements of OHADA member countries, ensuring adherence to local regulations.
Enhanced financial visibility: The software's reporting and analysis features enable users to gain insights into their financial performance, facilitating informed decision-making.
Time and cost savings: By streamlining accounting processes, reducing paperwork, and automating repetitive tasks, Solafide OHADA Accounting helps save time and cut operational costs.
Benefits:
Compatibility: 1.6
Solafide OHADA Accounting is compatible with multiple operating systems, including Windows 10. It supports popular web browsers such as Google Chrome, Mozilla Firefox, and Microsoft Edge.
Documentation Structure: 1.7
The documentation for Solafide OHADA Accounting includes the following sections:
Installation guide: Provides step-by-step instructions for installing the software on different operating systems.
User guide: Covers the software's features and provides detailed explanations on how to use its various functionalities.
Managing Your Solafide Accounting system guide: Offers solutions to common issues that users may encounter while using Solafide OHADA Accounting.
FAQs: Addresses frequently asked questions about the software and provides helpful answers.
API documentation (optional): If applicable, the documentation includes an API reference for developers who want to integrate Solafide OHADA Accounting with other systems.
Support and Community: 1.8
Users can access support for Solafide OHADA Accounting through various channels, including email, online forums, and a dedicated support portal. The software also has an active community of users and developers who can provide assistance, share knowledge, and contribute to its improvement.
Version Information: 1.9
Solafide OHADA Accounting follows a versioning scheme, with each version release accompanied by release notes detailing the changes, bug fixes, and new features introduced in that version. Users can stay updated with the latest version information to take advantage of enhancements and improvements.
License: 1.10
Solafide OHADA Accounting is released under a specific license coming soon...
Availability and Updates: 1.11
Solafide OHADA Accounting is available for download from the official website or designated software repositories. Users can access updates, bug fixes, and new features by downloading the latest versions from the official sources.
Acknowledgments: 1.12
Solafide OHADA Accounting acknowledges the contributions of the developers, contributors, and the open-source community whose efforts have made the software possible. The acknowledgments section recognizes the individuals and organizations that have played a significant role in its development and improvement.
System Requirements:
Specify the operating system(s) supported by the application (e.g., Windows ) and any specific version requirements (e.g., Windows 10). required hardware specifications, such as processor: AMD Ryzen 9, Dual core Intel Core i3, Ram memory : 2GB but recommended 4GB, and hard disk space:24GB
Prerequisites:
Just have python installed but which is not compusory
List any prerequisites or dependencies that need to be installed before installing the application. No specific requirement needed as of now.
Installation Method:
Explain the available installation methods, such as using package managers executable file, or cloning a repository from version control systems (e.g., Git).
Step-by-Step Instructions:
Step 1: Setting up your Account/ Logging in
• Initial Account Setup: As a First time user without any account;
• Open the Solafide accounting system, you will see a dialogue box requesting
“your name and password”. (Fig 1)
• Enter your name and choose a secure password.
• At the bottom of the box, click on the ‘Create Account’ option.
• The dialogue box will then switch to registration information.
• Fill in your name, email address, and create a password.
• Once you’ve completed the registration information, select the “Register”
option.
The Creation of an Entity
Go to new entity found at the top right of your screen and click on it.
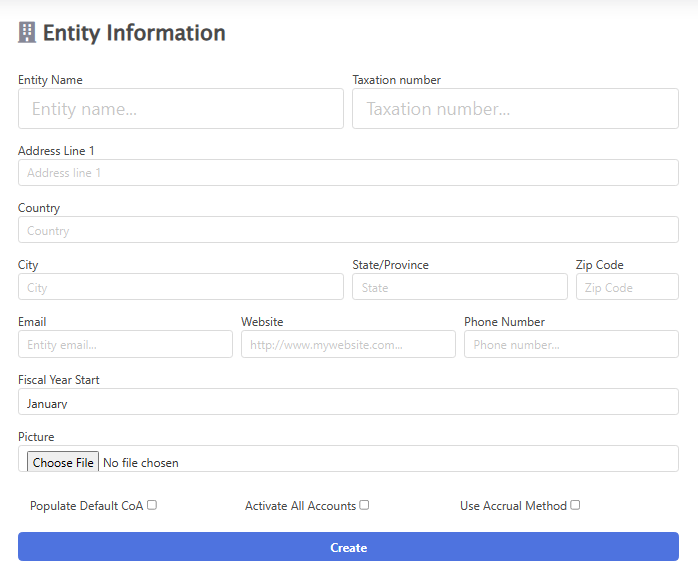
Entity information
a) Entity Name: The information needed here is the name of your business.
b) Taxation number: Fill in your company taxpayer number
13
c) Address line 1: Input the location in detail to which your business is found
d) Country: Put the country of your business location
e) City: Input the city location of the business
f) Sate\Provence: The region in which your business operates
g) Zip code: This could also be referred to as the P.O Box of your business, if any.
h) Email: Fill this box with the business email address, if any
i) Website: if the business has a website, then you fill it in this box.
j) Phone Number: In this box, put the business contact for communication when
necessary.
k) Fiscal year: This box already has a default month of January in it. This is due to
the fact that the fiscal year in Cameroon runs from January to December but it
might be different in some cases as such, ‘click in the box’ a pop-up menu will
appear, select the desired ‘month’.
l) Populate Default Chart of Account: This box advised to be ‘ticked’; this is to
ensure that the Solafide accounting system will load the default chart of account
as it is in the OHADA accounting plan. However, unless you don’t intend to use
it, you can leave it unticked.
m) Activate all Account: Make sure you ‘tick’ this box, to allow the Solafide
accounting system recognize an account when it’s been used. So once unticked
there will be no way the accounts will be used in the system.
n) Use Accrual Method: This box is optional as some businesses operate in a Cash
base system. So once left ‘unticked’ the system will understand that your business
operates on a cash base. But when ticked it can now operate in an accrual base
system.
o) Click on the ‘create option’ at the bottom and the information will be saved as
you will be sent to your dashboard
Adding Users to the System
The Solafide OHADA System allows the administrator to add as many users as it
please to enable the organizational structure of the entity grant access only to their
respective departments. So, to add a user in the system, all we do is
• Go to the side navigation bar and select ‘administration’ then click on
‘manage users’, on your workspace at the left side top take the ‘add user
caption’ with the ‘plus sign’. Another menu will open, all that will be left to
do is fill the information required like the role, the names, email and a
password which will later be given to the user. When done, click on the bottom
option that says Add User. Congratulations
Solafide Accounting Dashboard:
After creating your Entity, ‘the Dashboard’ will appear.
• You can then access the entity by taking the ‘open option’ found at the
bottom of the entity box where you will be shown the entity Dashboard
Managing Your Solafide Accounting system:
Management
This section allows the users to track their third-party accounts and the bank
accounts. That is, this section has items such as Customers, Suppliers, Banks/Cash,
Entity Unit and Inventory movement.
❖ Suppliers: Since Solafide system operates in line with the OHADA system
and chart of accounts, Suppliers are treated as third party accounts since they
affect the business externally.
To register a supplier in the system, create bank account info and add customer
• Go to the side navigation bar and click on ‘management’ then select
‘suppliers’
• At the top of the work space click on ‘add new suppliers’
Note:
When creating the account, the little box before the ‘create option’ should
always be ticked, if not the account will not be noticed when transactions are to
be recorded in it
Inventory Movement, Entity Unit $ Sales:
Inventory Movement:
This allows you to tract your stocks; that is, to know the
quantity that is at suppliers keeping, the one on transit and the quantity that you
have received.
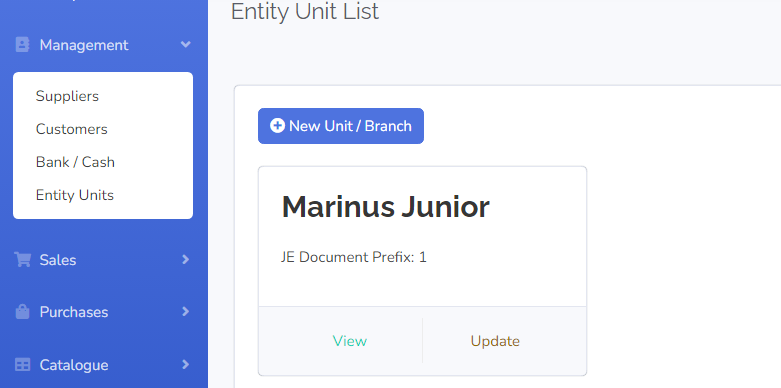
❖ Entity Unit:
This is a section under the ‘catalogue section’ that allows you to
create and keep track of your entities in other locations. In other words, the
branches your business may have in different areas. To do so, click on the
‘catalogue’ on the side navigation bar and select ‘entity unit’, then, fill the name,
location and the prefix of the entity. Click on ‘create’.
Sales:
Every business deals with goods or services; however there is need to
convert these goods/services to money through sales. Hence sales could be seen
as the act of exchanging products or services for money and in the Solafide
OHADA System sales is done as follows
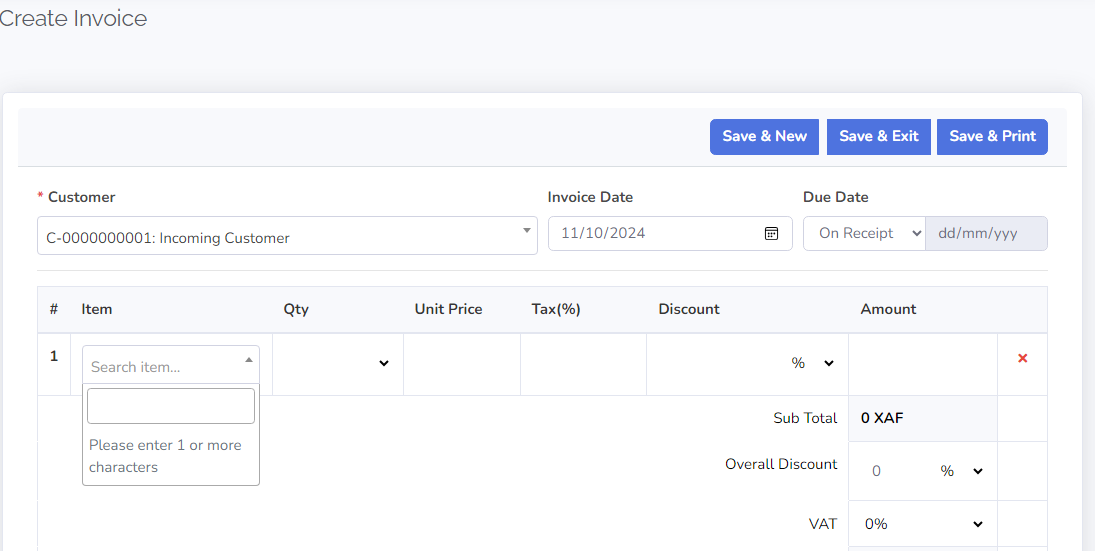
Invoice:
An invoice is a document that maintains a record of a transaction
between a buyer and seller. Or it is a list of goods or services provided by one
21
party to another, along with the statement of the sum owed for these. In other
words, it’s a bill sent along to request payment after work has been successfully
rendered in the Solafide OHADA accounting system. There are two types of
invoices the Credit and Cash invoice.
To create an invoice in the Solafide
OHADA Accounting system:
• Go to the side bar and click on ‘management’ then select ‘invoice’ and
• Go to the work space at the top left click on the ‘plus sign’ that has a caption
Invoices note select the invoice you wan
❖ Credit Note:
Also known as a credit memo, this is issued to indicate a return of
funds in the event of an invoice error, incorrect or damaged products.
Suppliers: 3.0
Suppliers: Since Solafide system operates in line with the OHADA system
and chart of accounts, Suppliers are treated as third party accounts since they
affect the business externally. To register a supplier in the system:
• Go to the side navigation bar and click on ‘management’ then select
‘suppliers’
Customers: 3.1
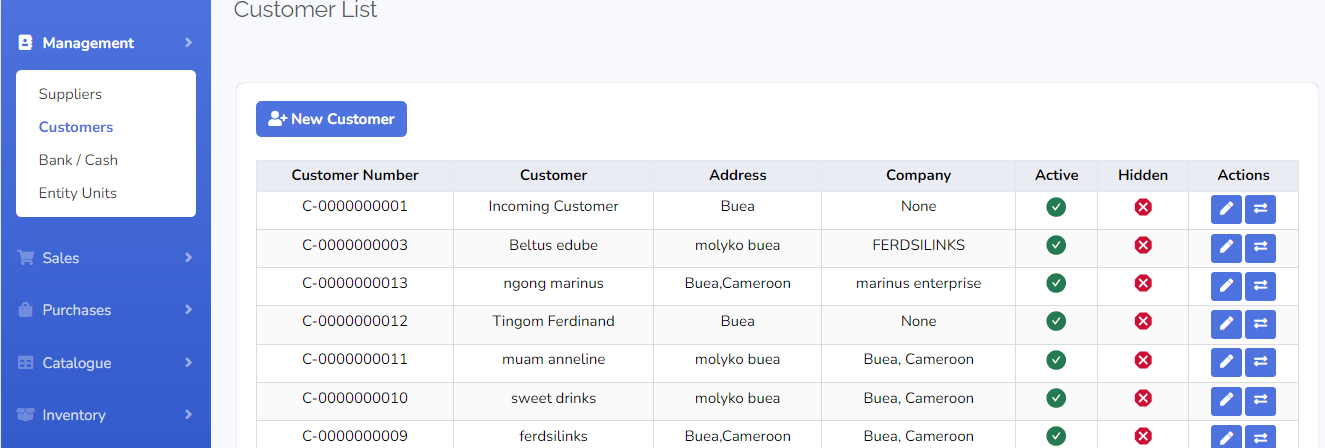
Customers: According to the OHADA chart of accounts, Customers are treated
as third-party accounts, as they affect the business not internally. They fall under
class four so in creating a customer data in the system. To register a customer in
the system:
• Go to the side navigation bar click on management and select customers
Bank/Cash: 3.2
Bank/Cash: Bank or Cash in the Solafide OHADA accounting system is made
up of three major elements which are cash at hand, cash at local bank and cash at
electronic money. To make use of any of these elements in the system:
• Set up the accounts in the chart of account (Error! Reference source not
found.)
• Go to the side navigation bar and click on ‘management’
• Select ‘bank/cash’ and then go to the work space and click on ‘new account’
which is found at the top left side of the workspace
Entity Unit: 3.3
Entity Unit: This is a section under the ‘catalogue section’ that allows you to
create and keep track of your entities in other locations. In other words, the
branches your business may have in different areas. To do so, click on the
‘catalogue’ on the side navigation bar and select ‘entity unit’, then, fill the name,
location and the prefix of the entity. Click on ‘create’.
Customer Relationship Management: 3.4
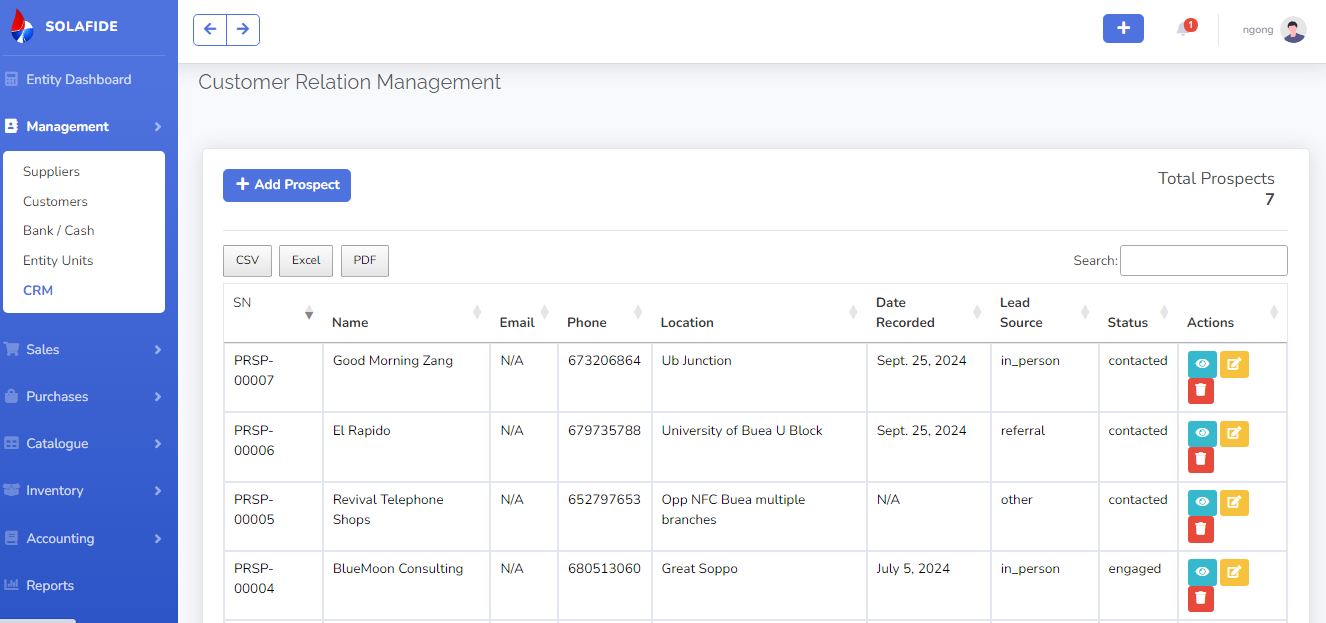
CRM: Customer Relationship Management (CRM) refers to strategies and tools that organizations
use to manage interactions with current and potential customers.
It helps streamline processes, improve customer service, and enhance communication.
By centralizing customer data, CRM systems enable businesses to analyze trends, personalize interactions, and ultimately drive sales and customer satisfaction.
Invoice Sales/Credit Sales 4.0
Invoice sales: An invoice is a document that maintains a record of a transaction
between a buyer and seller. Or it is a list of goods or services provided by one
21
party to another, along with the statement of the sum owed for these.
Cash Sales 4.1
Invoice: An invoice is a document that maintains a record of a transaction
between a buyer and seller. Or it is a list of goods or services provided by one
21
party to another while payment is emmidiately done.
Purchase Order: 5.1
A Purchase Order (PO) is a commercial document issued by
a buyer to a seller, indicating types, quantities, and agreed prices for products or
services required in creating the PO in the Solafide OHADA Accounting system
• go to the side navigation bar and click on Purchase then select purchase order
• Click on the plus sign at the end of the caption Latest Purchase order.
The interface that comes up at the top right of your work space will require
you to fill some information, when done with the inter face select the save
options you will want
Purchase Bills: 5.2
A bill is a commercial document sent by a seller to a buyer detailing the
amount the buyer owes for products or services they received. A bill is issued
before payment is sent, it provides a record of a transaction, and serves as a
reminder to the buyer to make a payment.
Creating a bill in the Solafide
OHADA System is not complicated all we have to do is:
• Go to the side navigation bar and select ‘Management’ then ‘bills’
• Then click the ‘plus sign’ at the top of the left side of your work space with the
caption latest bill.
An interface which is similar to that of the invoice will present itself on your work
space, all you have to do is fill the required information such as the supplier, the
due dates, products, VAT and discounts, means of payments and notes if any.
Expense Payment 5.3
During Purchases expenses encured are stored here so that it can help the business track th growth o the business
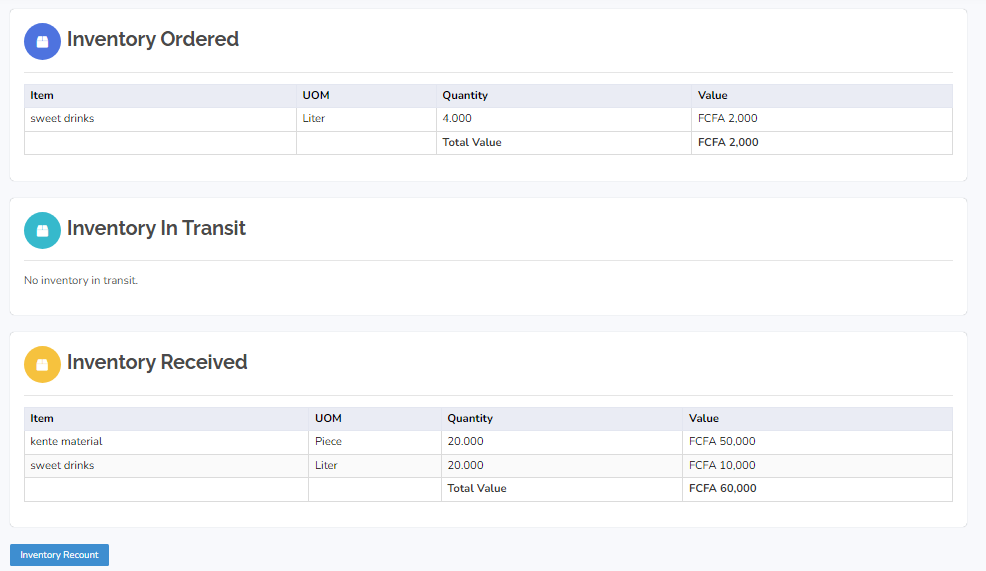
Inventory Movement: 7.0
This allows you to tract your stocks; that is, to know the
quantity that is at suppliers keeping, the one on transit and the quantity that you
have received.
Entity Unit:
This is a section under the ‘catalogue section’ that allows you to
create and keep track of your entities in other locations.
In other words, the
branches your business may have in different areas. To do so, click on the
‘catalogue’ on the side navigation bar and select ‘entity unit’, then, fill the name,
location and the prefix of the entity. Click on ‘create’.
Inventory Recount: 7.1
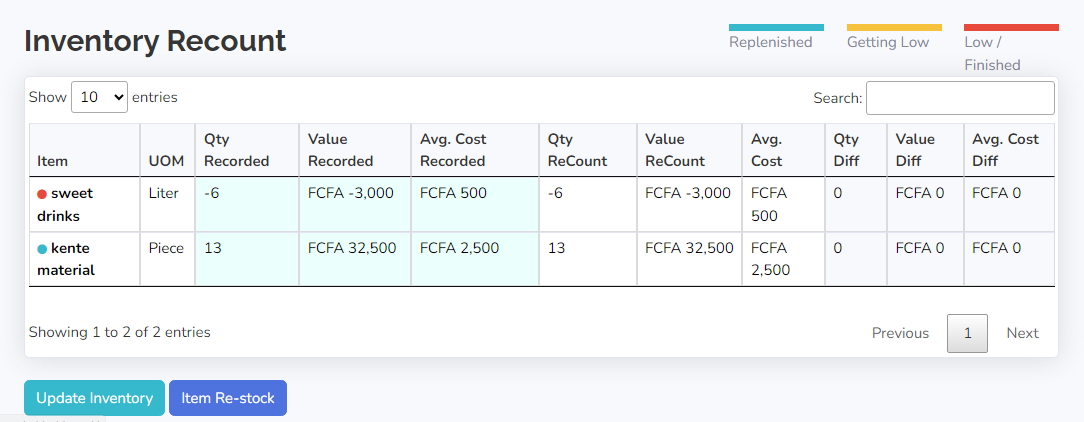
An inventory recount after stock is added involves verifying and adjusting inventory records to reflect new stock levels accurately.
This process helps identify discrepancies between physical stock and recorded quantities, ensuring accurate accounting.
Regular recounts enhance inventory accuracy, improve order fulfillment, and support better decision-making in inventory management.
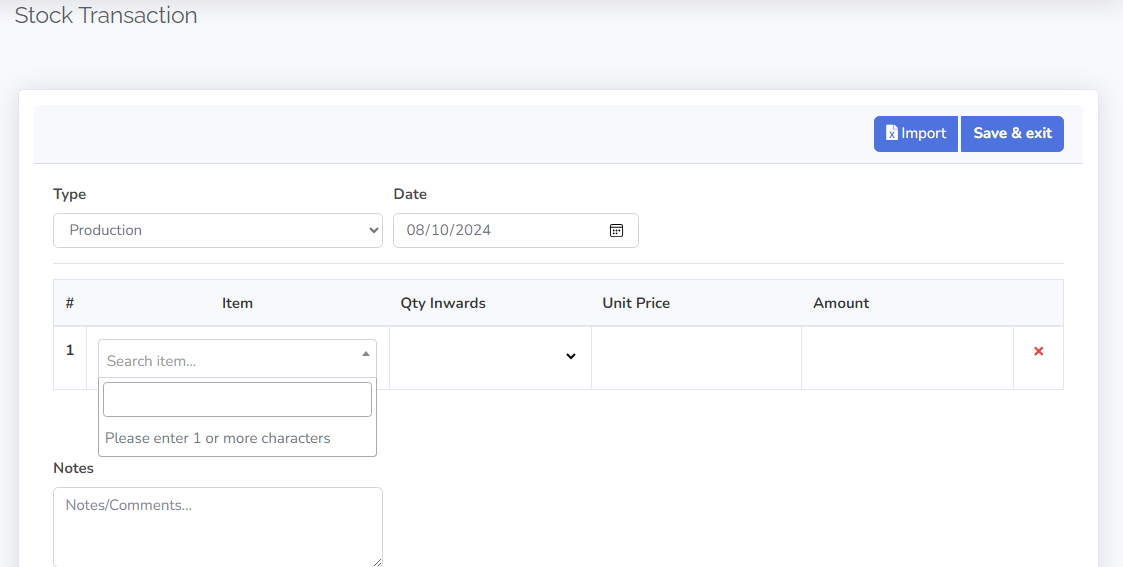
Stock Transaction: 7.2
An inventory recount after stock is added involves verifying and adjusting inventory records to reflect new stock levels accurately.
This process helps identify discrepancies between physical stock and recorded quantities, ensuring accurate accounting.
Regular recounts enhance inventory accuracy, improve order fulfillment, and support better decision-making in inventory management.
Adding an account 4.1
• Click on ‘Accounting’ found on the side navigation bar and select ‘chart of
account’.
• The chart of account will open and at the top of the list you will find ‘add
account’ caption with a plus sign at the front click on it.
A box will open up, demanding you to fill the ‘account code or number’,
account name, account role and the natural nature of the account that is if its
debit or credit balance.
Then click on ‘submit’ to add and save the account to the ‘account chart’.
Editing an Account 4.2
Click on ‘Accounting’ found at the side navigation bar and select ‘chart of
account’.
• The chart of account will open, go to the ‘action’ Colum found at the far right
of your work space and click on the ‘second action’ key which has a pencil
like shape so as to open the edit box of the account you want to edit.
• Once you click on the ‘edit icon’ the edit box will come up, there you can do the
changes you want.
Note:
When editing the account code or number it should be within the registered
class of account; that is, you cannot have a class five account having the account
code/number of classes one, the system will not make changes to such account.
When you finish making the changes you want, take the ‘submit option’ at the
bottom of the box and the system will save and make effect of the changes which
could be seen in the chart of account
Deactivating an Account 4.3
In deactivating an account in the Solafide accounting system, the system needs to
recognize the account when recording a business transaction.
In other words, the
account will not be presented to you when you look for it after deactivating.
Note:
Also to activate the account only click on deactivate or just follow the steps
bellow
• Go to accounting in the side navigation bar and select ‘chart of account’.
• Then move to the action Colum and click on the third icon which is ‘red’.
Once that is done the color will change to ‘green’ and then in the Active
Colum, there you will see it changed from green to ‘red’ which will mean the
account is ‘deactivated or inactive’.
The same process on a deactivated account will hold true for the account to
be activated.
Viewing of Account Report 4.4
Solafide accounting system makes it possible for you to view transactions of a
selected account. All you need to do is:
• To go ‘accounting’ on the side navigation bar and select ‘chart of account’.
• Then move to the action Colum and click on the first icon then a report of the
selected account will be presented to you.
Ledger: 4.5
The Solafide accounting system has the ledger section in which this
is where the recordings of transactions are done and in hopes to make the
recording simple for the user the ledger contain the journals as well.
Creating Leger Models
By default the system presents to you principally the various ledger models such as
the opening balance ledger, the sales ledger, the purchase ledger, cash ledger and the
general ledger.
But if you see the need to add more, follow this procedure.
• Go to ‘accounting’ at the side navigation bar and click on ‘ledger’
• The above ledgers will be presented to you but to add more you will click on the
‘plus sign’ found at the end of the heading
❖ Editing a Ledger:
In case you see the need to modify a ledger all you will need
to do is go to ‘accounting’ on the side navigation bar and select ‘ledger’ then
move to the action Colum and click on the ‘pencil like icon’. Click on the ‘update
option’.
❖ Deleting a Ledger:
To delete a ledger in the Solafide accounting system, go to
‘accounting’ on the side navigation bar and select ‘ledger’, then move to the
action Colum at the end of the three icons.
You will see a ‘red dustbin shaped
icon’ click on it and an interview question will come up asking if you are sure you
want to delete, you can then take the answer that suits you.
ii. ❖ Tax Rates:
Tax percentages may vary in the various countries or areas in which
the business are located but the tax that often has a fixed rate is the VAT (Value
Added Tax). To set this up in the system we:
• Go to ‘accounting’ on the side navigation bar and click on it a drop-down menu
will present it self
• Click on tax rates and a new box will show up
• At the top left of the box, you will see new tax rate click on it
A new box will come up in which you will have to fill the information; such as
the tax code, tax name, tax percentage, tax type, tax account and its matching
account.
Note:
The matching account in this case is the account in which the tax is been
calculated from.
For example, VAT on purchase is calculated from the purchase
account and VAT on sales is done from the Sales account
When done with the filling of the required information at the bottom you will
see the ‘create option’ click on it and the tax rate will be saved and ready for
use
Recording of Business Transactions
4.3
There are so many ways to carry out transactions in an accounting system; however,
in the Solafide OHADA accounting system there are two ways in which recording
can be done: the Bill and Invoice method or the Ledger method.
Firstly, note that
if you chose to use any of the methods above you must first record the open balances
in the system if you are a first-time user.
Recording Opening Balances
• Go to ‘accounting’ in the side navigation bar and select ‘Ledger’.
• A display box will present itself you then click on the ‘Opening Ledger’.
There at the action center click on ‘transactions’, this is represented by an icon
which has two arrows one pointing to the left and the other to the right.
At the end of the ‘recording cells’, you will see a save option. Once you are done
recording click the ‘save option’ and then take the done option. All your
recordings will be saved and ready to be locked.
Recording of transactions using Sales and Purchases method. 4.7
In this method, all the user has to do is issue an invoice or receive a bill and then the
system will automatically record the transaction for you. That means, even with little
or no OHADA accounting knowledge the user can still carry out the transactions and
the system will record the accounts for you.
To issue an invoice in the system follow
this procedure
In Sales:
• Go to the side navigation bar click on ‘sales and select invoice’ or you could move
to the plus sign found on you top right hand of your workspace and click on it, a
drop-down menu and select they kind of invoice you want.
be activated.
Then click on the action Colum at your work space, select the first icon which
has an ‘eye symbol’ on it
Once clicked upon the work space will present itself as such
Note:
At the left-hand side you will see invoice info and with a caption this invoice
is draft. That is to say, it’s not yet recorded.
To record it you will have to:
• Go to the ‘second option’ at the bottom of the invoice info which is marked as
‘review’ then answer the interview question that follow.
• Still in the work space a new option will come up make sure to take ‘approved’,
once that this done a new sheet will be presented informing you that the invoice
has been approved.
Now the transaction is recorded;
so, to see the accounts
involved just scroll down.
When payment is done, the second box that shows when scrolling down becomes
where the amount received from the customer can be imputed then take the ‘save
invoice’ option.
When payment is done in full you can then go on to ‘mark as paid’ option below.
In Purchases:
• Go to the ‘side navigation bar’ and select ‘Purchase’, click on ‘purchase bill’.
• Then go to the action Colum and click on the first icon which has an ‘eye like
symbol’
• An inter face which is similar to that of the invoice will present itself.
• Once clicked upon, the work space will present itself as such
Note:
On the left-hand side you will see Bill info with a caption, this Bill is a draft.
That is to say it’s not yet recorded and to record it you will have to
• Go to the second option at the bottom of the invoice info which is marked as
‘review’ then answer the interview question that follows.
• Still in the work space a new option will come up, make sure to take ‘approved’,
once that is done a new sheet will be presented informing you that the bill has been approved. Now the transaction is recorded and to see the accounts involved
just scroll down.
• When payment is done in instalments the second box that showing when
scrolling down, is where the amount paid to the supplier can be imputed then
take the ‘save bill’ option.
Finished.
The Purchase Order:
With the purchase order created, you can then click on the first icon under the action
Colum with an ‘eyelike symbol’.
Once clicked upon a new section will be displayed on your workspace and on the
right side of it the ‘mark review option’ can be seen, click on it and later take
approve.
Then scroll downwards till you see ‘purchase order’ items, move to the
‘status Colum’ and change the status to ‘Ordered’ and then take the ‘save option’ at
the bottom left
Recording of transactions using the Ledger method 4.8
• On the side navigation bar click on ‘accounting and select ledger’
• Once the ledger list opens, pick the ledger you want to record inside.
• Click on the journal found under the journal entries Colum
At the end of the caption JOURNAL ENTRIES, you will see a ‘plus sign’ click
on it
A box will display with the heading ‘create journal entry’, there you will fill the
information such as the time stamp, entity unite (if any) and the Description.
Note that for the time stamp you cannot select a date in the feature its either the
present date or a date in the past.
• Once you are done click on the ‘create option’ on the bottom of the box.
• To record the transaction in your newly created journal, go to the action Colum
and click on ‘transaction’, then your recording cells will open;
in which you can
then record the transaction.
However, note that for every account debited there must be a corresponding
account credited if not the account will not balance and the journal will not close.
• Once you record the transaction at the end of the recording cell you will see the
‘save option’ click on it and then you later take ‘done’.
Locking and Posting of Transactions 4.9
When done with the recording of the transactions in the journal at the bottom of
the list you will see the ‘lock option’ and the post option click on them
respectively, this is to ensure that the system should produce you the reports.
Another way to lock and post the transaction is to go under the action Colum
found at the far right of the display journal menu and select the ‘lock and post
actions’ respectively.
Locking a journal
• The same procedure above applies to the ledgers
N/B:
Once you lock the ledgers there is no more means for editing any
transactions, yes posting the ledger will help the system produce you the various
reports but once u lock the ledger there will be no more editing of the transactions.
Closing the Financial Year
Every fiscal year comes to an end it may be within the year or at end of the year,
That is to say December 31 depending on the country in which your business is
located.
However in the Solafide accounting system it has been made not only
possible but simple as well when it comes to closing the fiscal year or accounting
period and this is how it is done.
• Go to the side navigation bar and click on ‘accounting’ then select ‘closing
entries’.
• A box will come up to your work space, click on the ‘plus sign’ which is at the
end of the heading LATEST CLOSING ENTRIES.
Another box will present its self in which you will have to select a closing date
and once you do that take the ‘create closing entry’ option at the bottom.
• On the work space by the left-hand side, you will see the ‘post option’ click on
it and confirm the question that follows.
Note that no more journal entries before the selected closing date can be recorded,
since the system understands that the financial period as of the closing date has
come to an end.
Producing Reports and Subscriptions
✓ Reports:
A report is a structured document that presents information, data, or
findings on a particular subject or topic. It is typically written or presented in a
clear and organized manner to convey information to a specific audience.
Reports are used to analyze data, summarize important information, and make
informed decisions.
The reports generated in the Solafide accounting system, follow the OHADA
system of presentation, which is a standardized accounting format used in its
member states.
Here’s a more detailed explanation of how to access and view financial reports
in the Solafide accounting system:
• On the side navigation bar of the Solafide accounting system, you will find the
"Reports" option. Click on it.
• A menu will appear at your space with lots of reports grouped under four
sections, accounting, ledger, transactions and stocks. select “the Reports you
want " from the available options.
• The system will generate the report based on the data entered and transactions
recorded in the accounting system.
• The report will be displayed on your screen, providing you with the relevant
financial information in a structured and organized format.
• You can review the report, analyze the data, and use it for decision-making,
financial analysis, or reporting purposes.
For example:
• The Balance Sheet:
This report provides a snapshot of a company’s financial
position at a specific point in time, showing its assets, liabilities, and equity.
Building upon the overview of the balance sheet.
• The Income Statement: Also known as the Profit and Loss Statement, this
report summarizes a company's revenues, expenses, gains, and losses over a
specific period.
• The Trial Balance:
This report lists all the accounts and their balances,
providing a summary of the company's financial transactions. To tie the financial
48
reporting together, the trial balance acts as a connecting point between the
balance sheet’s financial position and the income statement's operational results.
• The Ledger Reports:
These reports provide detailed information about
individual ledger accounts, including transactions, balances, and any associated
sub-ledgers.
Alongside the balance sheet, examining the detailed transactions in
the general ledger reports can offer further context to the high-level information.
This is just to name a few as the list goes on and on.
These reports can be exported
from the system at any given time and to do so just move to the top right of your
work space and select the option you want.
By following these steps, you can easily access and view financial reports in the
Solafide accounting system. The system automatically generates these reports based
on the OHADA system of presentation, providing you with essential financial
insights and information about your company's financial performance.
Subscription:
When using the Solafide accounting system you have a trial period of one month and
after you will need to pay a subscription fee and this is how it can be done first you
go to the side navigation bar and then click on administration then select My
Subscription and, on your work, space take the option found at the top left which says
new request from there you can select the package you want and then follow the
directives.
Accounting Reports 9.1
Accounting reporting is the process of compiling financial data into structured statements that reflect an organization's financial performance and position.
This includes balance sheets, income statements, and cash flow statements. Accurate accounting reporting provides stakeholders with essential insights for decision-making, compliance, and evaluating the overall financial health of the business.
Ledger Reports 9.2
Ledger reports summarize all financial transactions recorded in an organization's accounts, providing a detailed view of debits and credits.
They help track financial performance over time, ensuring compliance and accuracy.
These reports are essential for audits, financial analysis, and decision-making, offering insights into the overall financial health of the business.
Transaction Reports 9.3
Transactions represent individual financial activities that affect an organization's accounts, such as sales, purchases, and payments.
Each transaction is recorded with specific details, including date, amount, and involved parties.
Accurate tracking of transactions is vital for maintaining clear financial records, supporting audits, and enabling effective cash flow management and financial analysis.
Items and Stock Reports 9.4
Items and stocks refer to the goods and materials a business holds for sale or production.
This includes raw materials, finished products, and inventory levels.
Effective management of items and stocks ensures optimal availability, minimizes holding costs, and supports efficient order fulfillment, ultimately enhancing customer satisfaction and business profitability.
Company/Entity Edit 10.0
Modify company information incase if they is any problem or updates about the company since it will be appearing on all receipt, invoices, reports, purchases and others.
Preference 10.1
Preferences refer to the specific choices or settings that individuals or organizations select to tailor experiences or operations to their needs.
In various contexts, such as software or customer interactions, preferences influence functionality,.
My Entities 10.2
"My entities" refer to the distinct organizations, individuals. These entities can represent consultants, companies and more in business.
Manage Users Role 10.3
Manage Users Role involves assigning specific permissions and responsibilities to individuals within an organization. This process ensures that users have appropriate access to resources and functionalities based on their roles.
Effective management enhances security, accountability, and collaboration, ultimately contributing to streamlined operations and improved organizational efficiency..
My Subscription 10.3
Proper subscription management ensures users receive the services they need while maximizing revenue for the organization.
It also allows for tracking user engagement and satisfaction levels..
Backup And Restore 10.3
Backup and Restore is a crucial process that involves creating copies of data to safeguard against loss or corruption.
Regular backups ensure data integrity, while the restore function enables quick recovery in case of system failures or accidental deletions.
This practice is vital for maintaining business continuity and protecting critical information..
Backups 12.0
Local backup and restore functionality in Solafide Accounting ensures the safety and security of your valuable financial data. By utilizing this feature, you can create backups of your accounting files and restore them whenever needed. Here's what you need to know about local backup and restore in Solafide Accounting:
To backup in SOAS (Solafide OHADA Accounting System) navigate to the bottom of the side navbar in the "subscription" and click on it you will have a dropdown from there select "Backup and Restore".
Then from the interface for backup you will choose the location where you want to backup your data and then click "BACKUP NOW"
Restore 12.1
Now restoring your baackedup data back into SOAS all you need to do is to navigate back to thesame subscription at the side navigation bar and selecting thesame "backup and restore" as in the backup process but from there you take "Restore Backup Now" .
then you will be brought here


